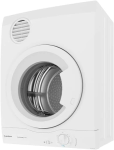
Your Unit’s Tiles

Tiles at Waves

The tiles inside your Unit and on your balcony are your responsibility and you should check them regularly and maintain them.

They will mostly look after themselves so it is not a big task.  Failure to maintain them can cause you significant expense.

Maintenance involves ensuring that pooled water is swept to the nearest floor drain. Any missing grout should be replaced as soon as possible.

In your shower areas, always make sure that all water drains away after use. This is important to minimise water seeping into the screed layer beneath the tiles.

If you see any yellowing or oozing near the silver strip at the bathroom doorway, you have a problem that will only worsen.

Here is a sample of the problem area:


Tile Edge Oozing

The primary objective should be to minimize water build up and pooling on the shower floor. This can be achieved by wiping up any residual water with an old towel after each use. If the shower floor drains as designed and all water drained away within say, 15 minutes, then towel drying the floor should not be needed and you are probably not seeing any of the tell tale signs described above.

Another suggested action is to have the tile grout lines in the shower stall treated with a quality sealant, thus minimising water penetration.

If your bathroom floors have degraded to the degree of the one shown above, then the only viable fix is a complete re-tile of the floor, which would entail new membrane applications, new screed and tiling. Several Units have already gone through this process and at the same time have fully modernised their bathrooms.

The money spent will always be recouped any time the unit might be sold.

Problem Area

Problem Detail

Balcony Doors

Your Balcony Doors

The doors to your balcony have an aluminium strengthener bar at the opposite end to the door handle.

This should not be used as a handle to slide the door, as I found out.  The beam is there to weatherproof and strengthen our doors in the case of a cyclone, or strong winds. It is only held in place at the top and bottom by two small stainless steel screws.

I used it once too often to slide the door open, and the lower screw came out of its anchor point.  Luckily I was able to re-attach the beam at the bottom by carefully locating the screw in its original anchor hole.


Alum. Brace Beam

The small stainless steel screw is at the bottom. Just under that is the hole for roller height adjustment.

Repainting Your Unit

If you are planning to repaint your unit, as we have recently done, then there is one great TIP you should consider.

That is, to have your painter use a gloss/semi-gloss paint on the Laundry walls.

This helps prevent the nasty build up of lint from the clothes dryer. Walls can now be easily wiped over to remove the lint.

Water Heater Anode Replacement

Your Hot Water Unit

Waves was built with Vulcan electric storage hot water systems. This shows a typical unit.
These heaters contain a sacrificial magnesium alloy anode, that is designed to corrode away ahead of any corrosion attacking the tank itself.

Vulcan and plumbers recommend replacing the anode each 5 to 8 years. These HWS units, if original, are now 9 years old. I know the anode in mine has never been replaced, so I recently set about the task.

Heater Top

The New Part

I got the new anode from Preece’s Plumbing in Clontarf. It was about $62 with GST.

Then I read on line the tools needed. A 27mm socket was recommended, and there was also a suggestion that a 28mm Tap Spanner would work. The Tap spanner would have worked, but for the turning bar being too thin, and just bending when I tried undoing the existing anode. The 27mm socket with half-inch drive is needed along with a socket handle and some form of extension so you can get enough force to unscrew the old anode. ( If you get brave and plan to change your HWS anode, you can contact John Griffiths U15 to borrow the socket and handle )

Items/Tools You Need

  • the new anode
  • a hacksaw
  • small screwdriver
  • strong G-Clamp
  • the 27mm socket, handle and handle extender
  • heat resistant gloves
  • some old rags

The Part

The Sockets

Cut New Anode

The new anode will likely be too long to be able to slide into the HWS as the ceiling height restricts it. I determined that if I cut off 25 cm I could get it in.
Use a hack-saw, and NOT an angle grinder. If you try using an angle grinder you will create a massive problem with burning sparks of magnesium. The magnesium will burn and you could create mayhem.

There is also an option to buy a segmented anode which will be easier to install where clear space above your heater is not available. These are like a string of sausages and can be fitted more easily if need be.  However, I suspect getting the old anode out will be a job where several cuts will be needed.

The whole replacement process tales some preparation and planning. At least 24 hours before you plan to do it, (or get it done by a plumber/handyman), turn off the electricity to the HWS in an attempt to get it a little cooler for the job.

On the day of the job, turn off the supply line to the HWS and the master valve to your unit.

Release the pressure in the piping by turning some taps on…

Too Long

Remove Old Anode

Once you loosen and unscrew the old anode, it will lift straight up. But will likely hit the ceiling.
Now you need your G-clamp to hold it up so you can make a cut in it. Use the gloves as it is still hot. Lift it up until near the ceiling and place the clamp at the heater top to hold it up.

Next, hacksaw through the old anode being careful not to cut the whole way. When it is nearly cut through, it should be able to be bent at the cut and broken off. Then lift the clamp with the remainder of the anode out.

You are now ready to insert the new one. Add some thread-tape to the new rod, which may have thread tape on it already.

Clean around the thread inside the heater with a rag, and slide the new rod in. Tighten firmly.


Extended Socket Handle

All Done

You can now turn the water supply back on, and check for any leak. Don’t forget to turn the power to the HWS back on.

This image shows the corrosion on the old anode. It is not too bad, and should look like this or worse. Its purpose is to prevent corrosion of your tank and your heater element.

Old corroded anode

Time taken

From start to finish, this task took less than an hour, and that was with some learning along the way.

Remember to start cooling your HWS the day before.

Note the date of the change on the bung on top of the heater. That will help in the future.


John Griffiths, U15

Disclosure: IANAP (I Am Not A Plumber)

Flexi Hoses

Hoses May Need Replacing

You will have flexi hoses in your Unit. These are susceptible to bursting as they age. A burst hose will cause damage and insurance woes.

The at-risk  “FLEXI HOSES” are those that connect to basin and sink mixers, and to toilet systems . The replacement of these hoses has been recommended by Chubb Insurance each 10 years.

Time to Renew

The Body Corporate strongly recommends that you arrange a licensed plumber to attend to all flexi hose replacements in your unit by the end of 2020.

Please email the BC when your unit has had its hoses replaced and we shall record the details.

This will assist minimise our Strata Insurance and perhaps save you the $1,000 insurance excess in the event of a claim.

Under Sink

Isolation Valves

It is also recommended that additional isolation valves be installed where flexi hoses connect to your water supply at the wall.

These should be where the flexi hoses connect to wall piping, usually in your bathroom, laundry and kitchen cabinets.

These small inexpensive valves offer extra protection enabling rapid isolation of failed hoses and are recommended by all insurers and plumbers.


Isolation Valve